The Backlight.... Rear Window, or simply Hell on Earth!
Whenever I have sought advice about removing the backlight, the almost unanimous reply has been "Don't mess with it".
Unfortunately for me this advice had come too late. So for those of you must, here are some tips.
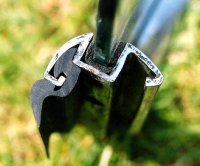 This photo shows how the glass frame seal, frame and body seal fit together.
The whole assembly complete with frame and body seal is pulled against the edge of the body recess by clips and shims
screwed to the car body from inside as shown later.
This photo shows how the glass frame seal, frame and body seal fit together.
The whole assembly complete with frame and body seal is pulled against the edge of the body recess by clips and shims
screwed to the car body from inside as shown later.
Removal and Replacement of the Window with the Frame
The first level of backlight hell is when you remove the frame complete from the car fit a new body rubber
to it and then refit the whole unit back to the car.
When removing the backlight from the car always make a note of how many shims are used under each clip,
since you are likely to use the same number when re-fitting it.
Removal is just a matter of unscrewing the clips and easing the whole unit outwards, away from the car body.
You are now free to do your re-spray or whatever, blissfully unaware of the ordeal that awaits you....
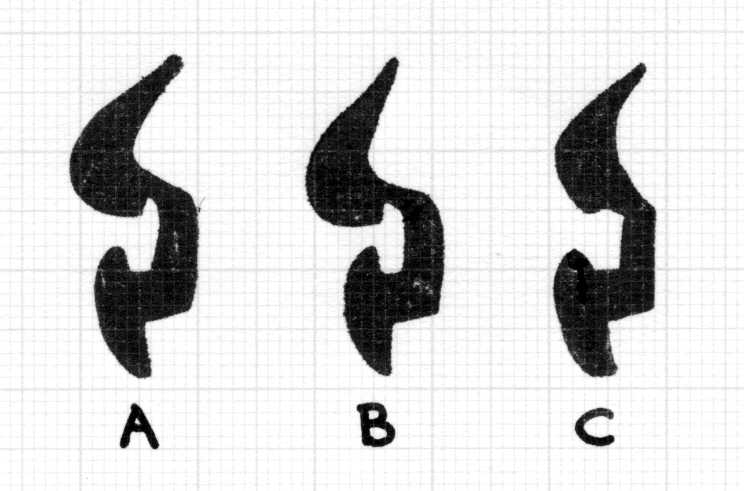
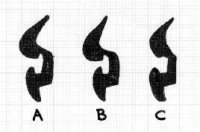 The worst problem that I found during re-fitting was that the new seal (C) was a different section to the original (B)
as shown here. At first I thought that the differences were not significant,
however Notice that the seal (B) has quite a deep recess behind the feathered edge to accommodate the outer corner
of the car body aperture. This recess is much shallower in seal (C), so when this (C) is pulled into the aperture,
the feathered edge is pushed away from the car body. In addition the back of (C) has far less bulk than the original (B),
which compounds the problem, because it is fullness here that makes the frame push the seal against the body, with the
thin part of the seal acting like a pivot.
The worst problem that I found during re-fitting was that the new seal (C) was a different section to the original (B)
as shown here. At first I thought that the differences were not significant,
however Notice that the seal (B) has quite a deep recess behind the feathered edge to accommodate the outer corner
of the car body aperture. This recess is much shallower in seal (C), so when this (C) is pulled into the aperture,
the feathered edge is pushed away from the car body. In addition the back of (C) has far less bulk than the original (B),
which compounds the problem, because it is fullness here that makes the frame push the seal against the body, with the
thin part of the seal acting like a pivot.
Try as I did, I could not get seal (C) to sit against the body properly.
At the 1999 National Rally I did some research,
and ascertained that all the sections on offer by the spares men were essentially the same.
I also talked to someone who had used one of the rubbers who said that he'd had to resort to gluing the edge down.
Luckily I sent a piece of my original seal to one of the spares men who offered to re-manufacture a new profile
for me. The result was the new section (A) which was almost indistinguishable from my original (B),
and I am extremely grateful for his help in making this possible.
At present I do not know if this section continues to be available, if it is suitable for all P4s,
or what is currently being offered by the other suppliers. Watch this space!
If you are a supplier and you are reading this,
Feel free to email me at the address on the home page
and I'll tell you where to send a sample, so that I can include the profile on this page.
If you are a customer I would strongly recommend you obtain sample cross-sections from several
suppliers and use the one you feel most appropriate. You should not have to buy blind.
Incidentally, you can't see the cross-section of the seal without cutting it, which would naturally render it
non-returnable, so you really do need a sample.
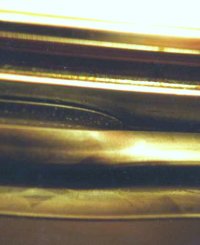
When fitting this seal to the frame it is easiest to hook the heel into the square part of the
frame slot all the way round the frame first.
Lubricate the crevice between the back of the heel and the frame (I used special Hellerine rubber lubricant for this,
which is available from Electrospeed You will have to phone them,
because their website is awkward to use! The stock number is 254-62063D)
Carefully work the seal into the slot with a blunt screwdriver. This picture isn't very clear, sorry.
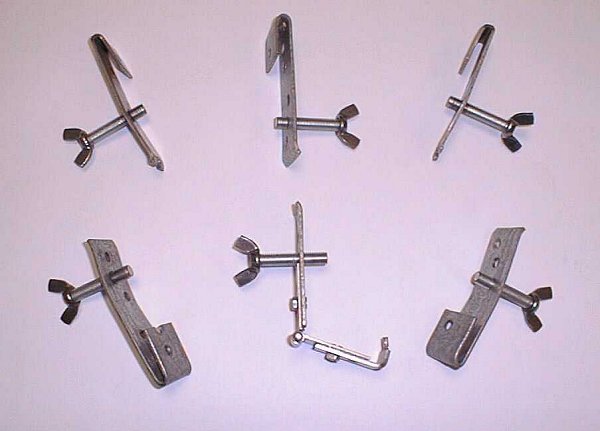
 The next problem I encountered was that the Rover P4 Drivers Guild tool-hire officer does not have a set of the
special clamp tools as shown in the manual. These are used to pull the frame into position.
The next problem I encountered was that the Rover P4 Drivers Guild tool-hire officer does not have a set of the
special clamp tools as shown in the manual. These are used to pull the frame into position.
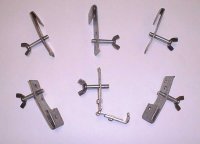
After debating the alternatives, including a system of pulleys, I decided it was probably easiest to make up a set.
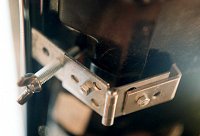
As you can see they're crudely made, but they work.
Click here for dimensions if you fancy making a set.
I found that galvanized building ties are the cheapest source of suitable metal and the holes are conveniently
just the right size to be tapped out to 8mm without extra drilling.
The leverage is better when the wing-bolt is nearer the hooked end of the clamp,
but the variation shown was acceptable. It is well worth making an extra couple of the top ones,
because I ended up grouping the clamps together in places to get enough leverage.
The ones for the bottom at the sides are the same dimensions as those for the top, but need to be twisted.
The bottom centre one is the most difficult to make, and has a prong that goes into the hole under the centre
of the window aperture.
 Here it is in position.
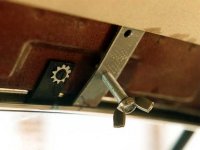 and here is one of the others in position. You can see one of the retainers that hooks under the edge of the frame,
on the left of the clamp. Notice the shakeproof washer. This one doesn't have any shims behind it.
The self tapping screws are of different lengths,
so it's a good idea to poke something into the hole first to make sure there is enough depth available,
otherwise you could distort the outer body skin as you tighten the screw.
and here is one of the others in position. You can see one of the retainers that hooks under the edge of the frame,
on the left of the clamp. Notice the shakeproof washer. This one doesn't have any shims behind it.
The self tapping screws are of different lengths,
so it's a good idea to poke something into the hole first to make sure there is enough depth available,
otherwise you could distort the outer body skin as you tighten the screw.
 When fitting the backlight I put a bead of Evo-Stick Frame and Gutter Sealant round the lip of the body aperture
before offering up the frame.
This not only seals the join but allows the whole thing to slide into position more easily.
It is a rubberised bitumen sealant and is closer to the original type than anything else I have found,
also the excess can be removed with white spirit.
When fitting the backlight I put a bead of Evo-Stick Frame and Gutter Sealant round the lip of the body aperture
before offering up the frame.
This not only seals the join but allows the whole thing to slide into position more easily.
It is a rubberised bitumen sealant and is closer to the original type than anything else I have found,
also the excess can be removed with white spirit.
I do not like silicone sealant because if you ever have to take the window out again you can never get the stuff
off satisfactorily without wrecking the paintwork.
Getting the window to fit nicely is a terrible job
made worse by the fact that the retaining clips are screwed to the single inner skin of the body with self tappers,
which may strip if excessive strain is placed on them. Use the clamps, levers, bad language and any other means
at your disposal to pull the frame into position in the body opening.
Do not attempt to get the frame flush with the car body, but aim for the best over-all fit,
with the rubber seal seating as well as possible all the way round.
You will find that if you pull the frame too far into the car the feathered edge of the seal will pivot away from the body.
This may seem counter intuitive at first, but
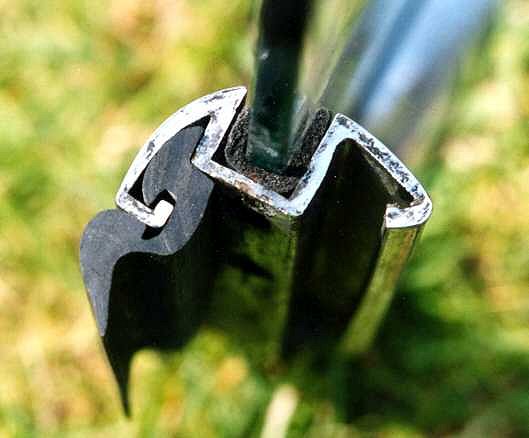
if you look at the cross section in the photo at the top of this page, you can see why this happens.
I would suggest getting the sides to fit nicely first, while watching the gap between the body and frame all the way round,
and sharing out the free play, if any.
Once the sides are looking reasonable,
put in some of the retaining clips in this area using shims as required tightening lightly,
then turn your attention the top and bottom edges. Do not be afraid to lever things carefully. (yes really!)
Be prepared to start again. And again, until it looks right. When you have got it right, go out and celebrate!
Dismantling and Re-Assembly of the Backlight Frame
The second level of backlight hell comes when you decide to dismantle the frame it's self.
It is in two halves which are joined by straps in the glass recess with 4 screws each side.
The bottom screws are likely to be rusted solid. The glass sits in a slot in the frame, cushioned,
and hopefully (some hope) sealed by a U-section of pitch impregnated fibrous stuff.
You can see this in the first photo at the top of the page.
The sections of glass are joined by an H shaped rubber extrusion. Before you dismantle the frame, be warned,
read the rest of this first!
 For the U section the nearest seems to be section R250 from Woolies.
The frame is extremely difficult to assemble. If any of you would like to write an article about doing this job
why not email me.
Another trap for the unwary lies with the vertical strips. The original section is shown at the bottom of the picture.
The section at the top is offered by most of the spares men as a replacement.
As you can see it is really intended for joining much thinner material, and I have never seen one used in anger.
Although I have not seen any concrete evidence yet, I understand that J. R. Wadhams has come to the rescue,
and now offers a replica of the original section.
If this is true, I strongly advise you to use this!
Eamonn Burnell has written a very good account of both these jobs in the Rover P4 Driver's Guild 2001 yearbook.
It's well worth a read if you can get hold of a copy.
The "Cheat Method" for Fixing Glass to Frame Leaks
With so many problems to overcome, I decided not to dismantle my backlight frame, but try and re-seal it while
still assembled... I think this method is best used once the frame is back on the car
and it has had time to settle, so that subsequent movement is kept to a minimum.
I found that the following method has stopped all the leaks for five years so far, so it is tried and tested!
I dug out some of the original fibrous seal between the outer surface of the glass
and the frame, taking care not to scratch anything of course. Then I cleaned out the furrow with a brush.
Next I ran two strips of masking tape round the window, one up to the lip of
the frame and the other parallel on the glass, leaving a gap that I could work "U-Pol Tiger Seal"
into using my finger without smearing it all over the frame or glass.
I carried the masking tape over the vertical strips so that sealant could be
worked into the corners of the join to try and ensure a watertight seal.
"U-Pol Tiger Seal" is a really first class sealer with superb adhesion.
It hardens into a flexible rubber-like material.
Removing the masking tape once the sealant has partially cured leaves a neat looking job.
Positioning the masking tape is a bit time consuming, but it really does save time in the long run.
A word of warning.DO NOT be tempted to use "U-Pol Tiger Seal" for assembling the backlight frame,
or fitting the frame to the car. It will be impossible to dismantle ever, ever again,
and the person who tries to do it in the future and makes a mess of the car will hate you!
This said, it's OK to use it here, because you are only applying a shallow weatherproofing bead,
without much inherent strength.
BACK TO THE TECHNICAL MENU
HOME
 The worst problem that I found during re-fitting was that the new seal (C) was a different section to the original (B)
as shown here. At first I thought that the differences were not significant,
however Notice that the seal (B) has quite a deep recess behind the feathered edge to accommodate the outer corner
of the car body aperture. This recess is much shallower in seal (C), so when this (C) is pulled into the aperture,
the feathered edge is pushed away from the car body. In addition the back of (C) has far less bulk than the original (B),
which compounds the problem, because it is fullness here that makes the frame push the seal against the body, with the
thin part of the seal acting like a pivot.
The worst problem that I found during re-fitting was that the new seal (C) was a different section to the original (B)
as shown here. At first I thought that the differences were not significant,
however Notice that the seal (B) has quite a deep recess behind the feathered edge to accommodate the outer corner
of the car body aperture. This recess is much shallower in seal (C), so when this (C) is pulled into the aperture,
the feathered edge is pushed away from the car body. In addition the back of (C) has far less bulk than the original (B),
which compounds the problem, because it is fullness here that makes the frame push the seal against the body, with the
thin part of the seal acting like a pivot.
 The next problem I encountered was that the Rover P4 Drivers Guild tool-hire officer does not have a set of the
special clamp tools as shown in the manual. These are used to pull the frame into position.
The next problem I encountered was that the Rover P4 Drivers Guild tool-hire officer does not have a set of the
special clamp tools as shown in the manual. These are used to pull the frame into position.