The Rear Axle
How do you know if your back axle is OK? The chances are, if it's quiet, it's OK. If there is a whining noise,
which rises in pitch with the speed of the car but is independent of the gear your in,
and if it gets quieter when the car is just coasting, then you're diff's probably seen better days.
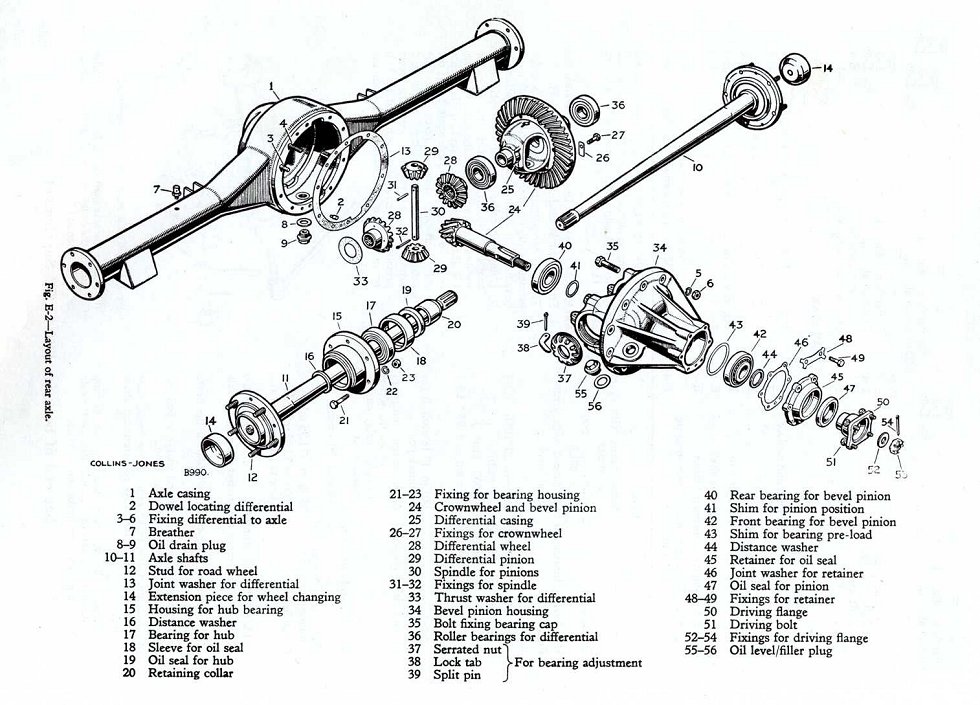
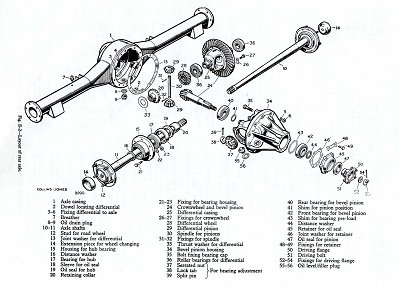 This picture shows an exploded view of the back axle.
As usual, you can click on it for a bigger version.
The power is transmitted through 90 degrees by the crown wheel and pinion (24)
The teeth on the crownwheel and pinion are cut in a spiral bevel pattern to reduce the noise as the
teeth mesh at high speed. It is misalignment and subsequent wear of these parts that cause the whining noise.
The actual differential proper consists of the rather unexciting cogs (28) and (29)
contained in the differential casing (25) which rotates with the crown wheel.
The function of the differential is to allow the cogs (28), and hence the road wheels via shafts (10),(11),
to be driven at different speeds as the car goes round a corner.
This is necessary because the outer wheel must travel further than the inner one,
but must still have power delivered to it. It follows that when the car is travelling in a straight line,
the wheels rotate at the same speed and the differential is doing nothing.
The gear wheels in the differential can be straight cut because they do not mesh rapidly enough
to cause objectionable noise.
This picture shows an exploded view of the back axle.
As usual, you can click on it for a bigger version.
The power is transmitted through 90 degrees by the crown wheel and pinion (24)
The teeth on the crownwheel and pinion are cut in a spiral bevel pattern to reduce the noise as the
teeth mesh at high speed. It is misalignment and subsequent wear of these parts that cause the whining noise.
The actual differential proper consists of the rather unexciting cogs (28) and (29)
contained in the differential casing (25) which rotates with the crown wheel.
The function of the differential is to allow the cogs (28), and hence the road wheels via shafts (10),(11),
to be driven at different speeds as the car goes round a corner.
This is necessary because the outer wheel must travel further than the inner one,
but must still have power delivered to it. It follows that when the car is travelling in a straight line,
the wheels rotate at the same speed and the differential is doing nothing.
The gear wheels in the differential can be straight cut because they do not mesh rapidly enough
to cause objectionable noise.
Differential Removal and Replacement
This is certainly not a job to be undertaken lightly.
It combines groveling about under the car in a limited space,
extremely heavy components, a significant chance of wrecking the rear brake pipes or wheel cylinders,
and a great deal of mess. You will also need axle stands and a good trolley jack, or a lift or a pit.
The latter two being preferable, if a little optimistic! Not put off yet? Then read on......
Jack up the back of the car until both wheels are off the ground and support the car on axle stands
and chock the front wheels. Take off the handbrake and satisfy yourself that the car is stable.
Before removing the road wheels,
crawl under the car and undo the nuts and bolts securing the propshaft flange to the driving flange (50).
Pull the flanges apart and swing the propshaft up and rest it on top of the silencer
so that it is not dangling down in your way. You should wear eye protection to stop stuff falling into your eyes.
Now place a container of greater than 2 liters capacity under the axle casing,
and drain out the oil by removing the drain plug (9).
 While the oil is draining, loosen and remove all but one of the nuts (9/16th inch AF)
holding the bevel pinion housing to the axle casing.
These may be difficult to locate as often oil leaks have attracted dust and dirt which builds up to a
thick coating all over the assembly. If you are planning to recondition your unit,
rather than swap it for another one,
bear in mind the more muck you get rid of now the less will fall into the working parts later!
Otherwise, just concentrate on removing enough of it to get the nuts and shakeproof washers off,
and clean up the area round the join so than none will fall into the axle casing as you remove the assembly.
While the oil is draining, loosen and remove all but one of the nuts (9/16th inch AF)
holding the bevel pinion housing to the axle casing.
These may be difficult to locate as often oil leaks have attracted dust and dirt which builds up to a
thick coating all over the assembly. If you are planning to recondition your unit,
rather than swap it for another one,
bear in mind the more muck you get rid of now the less will fall into the working parts later!
Otherwise, just concentrate on removing enough of it to get the nuts and shakeproof washers off,
and clean up the area round the join so than none will fall into the axle casing as you remove the assembly.
It is not possible to remove the assembly from the back axle without first withdrawing the splined
axle shafts (10),(11) from the differential .
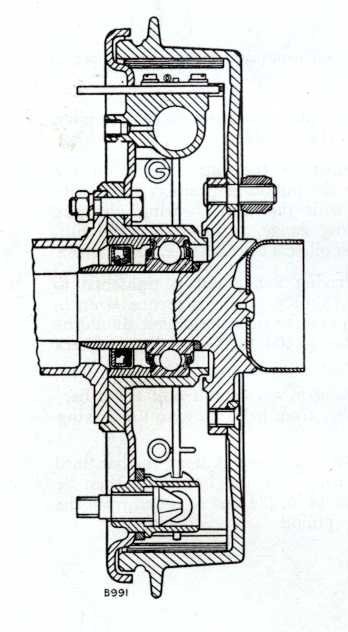
 This picture shows a sectional view of the rear hubs,
and the bolts (21,22,23) that hold the axle shaft assembly in place.
It is a good idea to clean as much of the mud as you can from the area to avoid it getting in the works
when you pull the axle shafts out.
This picture shows a sectional view of the rear hubs,
and the bolts (21,22,23) that hold the axle shaft assembly in place.
It is a good idea to clean as much of the mud as you can from the area to avoid it getting in the works
when you pull the axle shafts out.
Notice that the bearing is held on the axle shaft by a collar which is an interference fit on the shaft.
The oil seal runs on the collar and is held in position in a sleeve which also secures the outer
race of the bearing in the bearing housing. The bearing is lubricated at assembly and
no provision is made for subsequent lubrication.
The hub bearing can not be renewed without a special puller for extracting and fitting the hub collar.
The Rover P4 Drivers Guild does not have one of these for members to hire.
Now that you have some confidence that the car isn't going to collapse on you,
it is time to remove both rear road wheels. Slacken off the brake drum adjusters and remove the brake drums.
Wire the rear brake cylinder pistons in place and remove the rear brake shoes.
Clean up the clevis connecting the handbrake draw link to the brake cross rod, remove the remains of the split pin
from the clevis pin, and unscrew the clevis pin using a broad bladed screwdriver.
If it is jammed solid (likely), there are flats on the threaded end of the clevis pin which you may be able to fettle
up and get a small spanner on. Disconnect the handbrake rods.
Loosen the hydraulic brake pipe unions at the wheel cylinders
(hopefully without damaging anything.... remember sacrifice the pipes first if necessary,
they're 1/10th of the cost of new cylinders) and wedge the brake pedal down to stop all the fluid draining out.
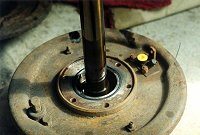
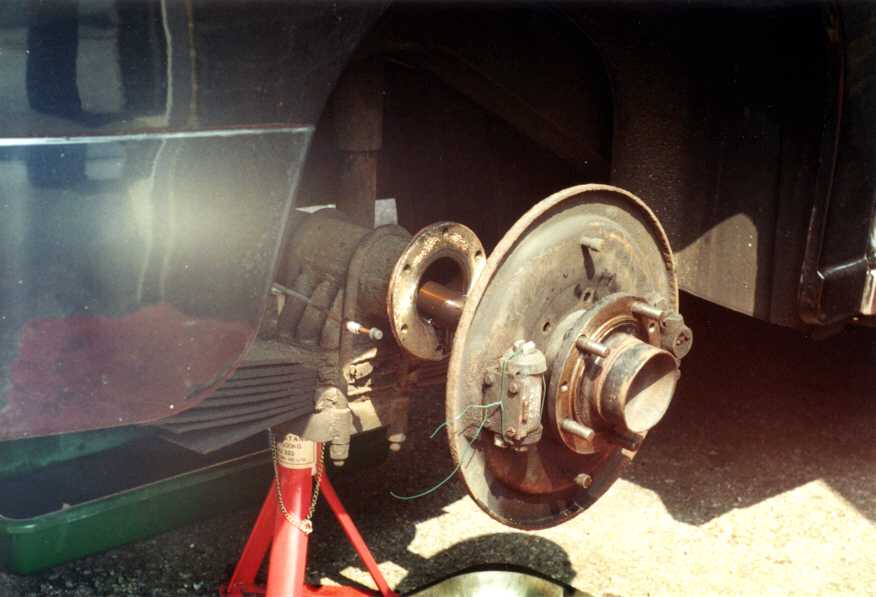
 Place drip trays under each side of the axle and undo the nuts and bolts holding the axle shaft assemblies in place.
Again these are 9/16th inch AF. To remove the hub assembly,
try pulling on the bearing housing rather than the back plate which is not attached to the hub housing.
It is unlikely to be necessary, but you may need to try knocking the bearing housing flange at (A)
in the picture with a hammer and block of wood to break the seal.
Fully undo the brake pipe unions and protect the ends of the pipes with bleed nipple covers if you have any.
Withdraw the axle shaft assembly.
Place drip trays under each side of the axle and undo the nuts and bolts holding the axle shaft assemblies in place.
Again these are 9/16th inch AF. To remove the hub assembly,
try pulling on the bearing housing rather than the back plate which is not attached to the hub housing.
It is unlikely to be necessary, but you may need to try knocking the bearing housing flange at (A)
in the picture with a hammer and block of wood to break the seal.
Fully undo the brake pipe unions and protect the ends of the pipes with bleed nipple covers if you have any.
Withdraw the axle shaft assembly.
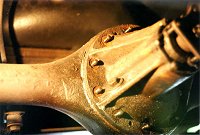
 This picture shows the bit that bolts up against the flange on the axle casing.
Notice the rubber O ring that is not illustrated in the sectional diagram of the hub!
This o-ring performs two vital functions.
This picture shows the bit that bolts up against the flange on the axle casing.
Notice the rubber O ring that is not illustrated in the sectional diagram of the hub!
This o-ring performs two vital functions.
Firstly it stops oil seeping down between the oil sleeve seal (18) and the hub bearing housing (15),
washing the grease out of the wheel bearing, and then leaking into the brake drum.
It also stops oil escaping between the bearing housing and axle casing and running down the brake back plate.
It is a false economy not to replace this O ring when you re-assemble everything,
since a leak will ruin the wheel bearing and brake shoes and cause great avoidable expense.
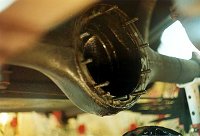 With the axle shafts withdrawn it should now be possible to remove the pinion
housing assembly complete with differential from the axle casing.
It is very heavy indeed. Much heavier than it looks. Get the idea!
If you are going to recondition the unit, put a thick cushion,
or layers of old carpet on the ground underneath the axle (otherwise don't bother)
Undo the last nut and give the pinion housing a few blows with a mallet to loosen it up.
Pull the assembly out of the axle casing towards the front of the car. DO NOT GET UNDERNEATH IT!
Get your arms in a position where they will not get trapped or twisted. Pull the thing out and let it fall to the ground.
With the axle shafts withdrawn it should now be possible to remove the pinion
housing assembly complete with differential from the axle casing.
It is very heavy indeed. Much heavier than it looks. Get the idea!
If you are going to recondition the unit, put a thick cushion,
or layers of old carpet on the ground underneath the axle (otherwise don't bother)
Undo the last nut and give the pinion housing a few blows with a mallet to loosen it up.
Pull the assembly out of the axle casing towards the front of the car. DO NOT GET UNDERNEATH IT!
Get your arms in a position where they will not get trapped or twisted. Pull the thing out and let it fall to the ground.
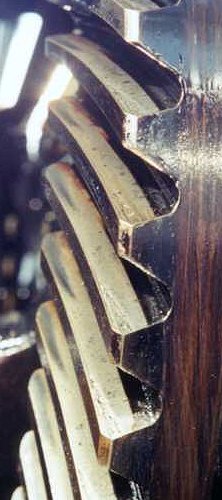
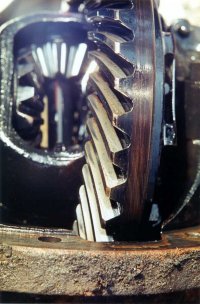 This picture shows the uneven wear on the crownwheel teeth on the differential from my car.
The outer tips are rough and pitted. It is interesting to note that although the thing whined badly,
it was nowhere near mechanical failure. There really is a huge amount of metal in these things!
The differential cogs can be seen in the background.
This picture shows the uneven wear on the crownwheel teeth on the differential from my car.
The outer tips are rough and pitted. It is interesting to note that although the thing whined badly,
it was nowhere near mechanical failure. There really is a huge amount of metal in these things!
The differential cogs can be seen in the background.
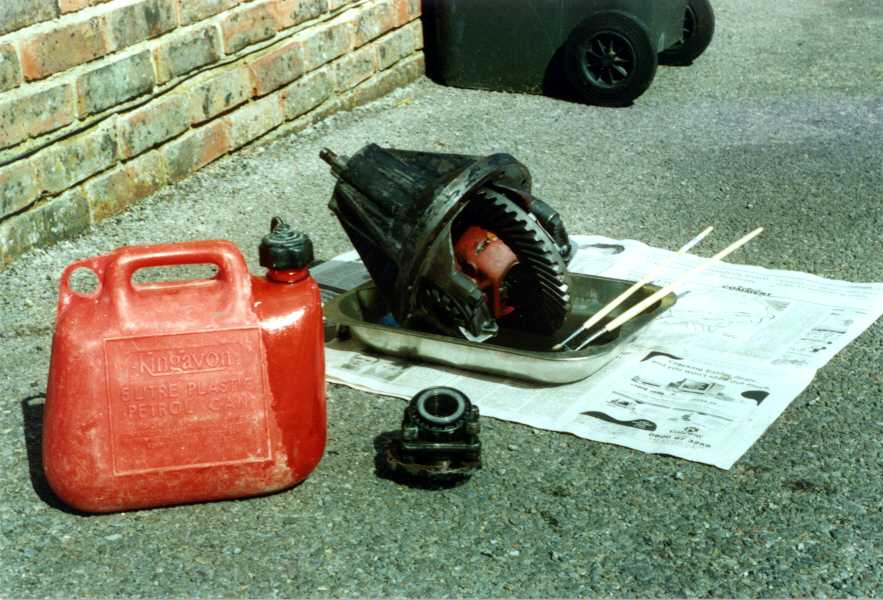
The differential I was going to fit had been removed from a scrap car
by somebody using an oxy-acetylene torch to cut through the axle casing and shafts.
This made the job easy for them and kept the cost down because it saved them time,
but it had resulted in hundreds of tiny globules of metal to getting everywhere inside the works.
There was no alternative but to clean it all out properly.
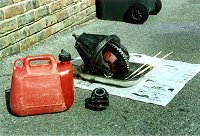 In order to clean the unit effectively I ended up removing the pinion drive flange and the forward pinion roller bearing,
and working petrol into all the nooks and crannies with small artists paint brushes.
Once the petrol had evaporated any adhering globules were brushed away.
Do not use a vacuum cleaner anywhere near petrol vapor, since sparks from the motor may ignite it!
The pinion bearing, driving flange and oil seal housing can be seen removed in the foreground.
In order to clean the unit effectively I ended up removing the pinion drive flange and the forward pinion roller bearing,
and working petrol into all the nooks and crannies with small artists paint brushes.
Once the petrol had evaporated any adhering globules were brushed away.
Do not use a vacuum cleaner anywhere near petrol vapor, since sparks from the motor may ignite it!
The pinion bearing, driving flange and oil seal housing can be seen removed in the foreground.
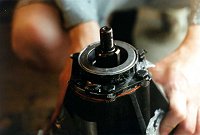
Differential Pinion Bearing and Oil Seal
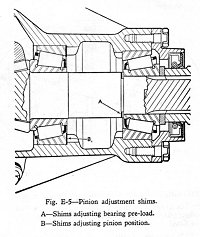 Here you can see how the pinion bearing and oil seal are arranged in the nose of the pinion housing,
and pinion oil seal housing respectively. The crown wheel and pinion exert a huge amount of force on each other,
and it is necessary to pre-load the pinion bearings in order to maintain correct alignment of the gears
under these conditions. Misalignment will cause more rapid wear of the gears.
The mesh can be checked by painting the gear teeth with engineers blue and observing the pattern made by the teeth
as they mesh.
Here you can see how the pinion bearing and oil seal are arranged in the nose of the pinion housing,
and pinion oil seal housing respectively. The crown wheel and pinion exert a huge amount of force on each other,
and it is necessary to pre-load the pinion bearings in order to maintain correct alignment of the gears
under these conditions. Misalignment will cause more rapid wear of the gears.
The mesh can be checked by painting the gear teeth with engineers blue and observing the pattern made by the teeth
as they mesh.
It is not possible to adjust the pinion height to compensate for wear in the forward (left hand) taper bearing
unless the special tools for measuring pinion height and removing the bearing race are available.
The Rover P4 Drivers Guild once again does not have these tools for members to hire.
The oil seal can be renewed and the pre-load set without the use of special tools.
Removing the Pinion Oil Seal and Driving Flange
First knock back the tab washers securing the pinion oil seal housing to the nose of the pinion housing.
Clean up the general area as much as possible.
Remove the bolts securing the oil seal housing to the pinion housing and save the tab washers,
you may have to re-use them, or copy them. Remove the split pin and castellated nut from the pinion shaft.
If you are doing this with the unit on the car the easiest way of locking the pinion is by applying the handbrake.
If the unit is out of the car, jam the crownwheel with a block of wood.
You should now be able to withdraw the driving flange. Tap the oil seal housing to break the seal and remove it.
You can now withdraw the forward roller bearing and pre-load adjustment shims (A) from the pinion shaft.
Setting the Pinion Bearing Pre-load
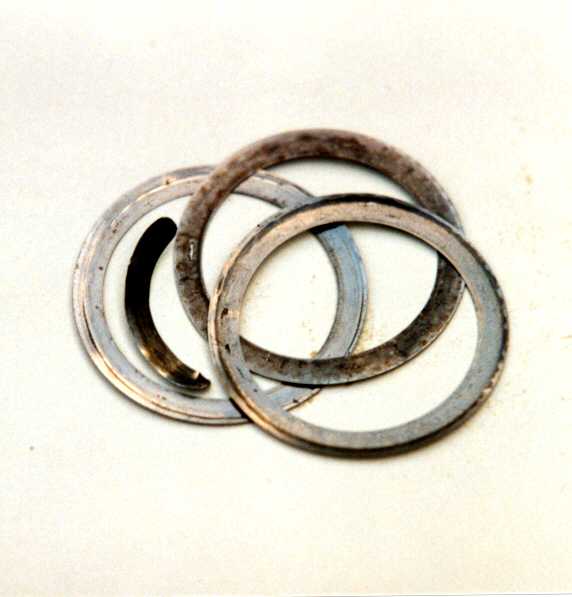
 In my experience the shims that affect the bearing pre-load (A) tend to wear and break up as shown here.
This will be obvious because the castellated nut securing the driving flange to the pinion shaft will appear
looser than expected. If this has happened you will have to buy some news shims from Landrover or John Wearing
before you can reassemble the unit.
In my experience the shims that affect the bearing pre-load (A) tend to wear and break up as shown here.
This will be obvious because the castellated nut securing the driving flange to the pinion shaft will appear
looser than expected. If this has happened you will have to buy some news shims from Landrover or John Wearing
before you can reassemble the unit.
The pinion bearing pre-load must be set before the oil seal housing is re-fitted.
Do this by adding and subtracting shims (A) until a pound weight will turn the pinion
when placed about 9 inches along a light wooden rod resting between the drive flange bolts,
with the castellated nut tightened to about 85 foot pounds and one of the holes for inserting the
split pin aligned with a castellation in the nut.
Notice that there are two holes through the pinion shaft at 90 degrees so that the most you have to over
or under together the nut is +/- a 1/24th of a turn.
Once the correct number of shims has been established,
remove the drive flange one more time ready to fit the pinion oil seal and housing.
Replacing the Pinion Oil Seal and Driving Flange
To remove the old seal, support the housing between two blocks of wood with the forward end pointing down,
and drive the seal out from behind using a suitable drift.
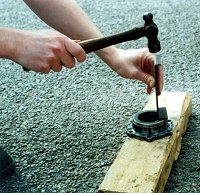 Here you can see my long-suffering assistant tapping the new oil seal into the housing with the oil seal lip facing inwards.
Be sure to tap it in squarely.
Here you can see my long-suffering assistant tapping the new oil seal into the housing with the oil seal lip facing inwards.
Be sure to tap it in squarely.
Examine the surface of the drive flange that the oil seal runs against for signs of wear or scoring.
There is likely to be a rut where the oil seal has been running, if it's smooth it's probably serviceable.
If not, you can either have it lightly machined to restore the surface.... not too much or it will be too small....
or you can try and find a better one. Changing the drive flange will not affect the pinion bearing pre-load.
 Smear sealant on the mating surface of the pinion oil seal housing and offer it up to the pinion housing.
fit the tab washers and loosely screw in the housing retaining bolts.
Smear sealant on the mating surface of the pinion oil seal housing and offer it up to the pinion housing.
fit the tab washers and loosely screw in the housing retaining bolts.
Fit the drive flange, castellated nut and split pin as discussed.
Waggle the oil seal housing to allow it to centralise on the flange,
tighten the bolts and knock over the tab washers to prevent them shaking undone.
Fitting The Differential To the Axle Casing
In an ideal world one would simply walk under the car, fit a new gasket to the axle casing,
lift the "diff" into position and fit the spring washers and nuts securing it to the casing.
In reality, you're lying on your back under the car, and you realise that you can't even lift the thing off the ground,
never mind position it! As for keeping the muck off it.... Is this the bitter voice of experience speaking, or what!
Once the panic and depression had subsided, I positioned the "diff" under the car on about 1 inch height of wood.
I then lowered the back of the car using a trolley jack under the rear chassis cross member until the spring shackles
were resting on the ground.
It was then possible to reach in through the wheelarch and drag the "diff" into position nearly
ripping the gasket in the process.
Even though I have very long arms, this was extremely difficult and by far the worst bit of the whole job.
Once in position the nuts can be tightened to pull the unit squarely up to the axle casing flange.
Some care must be taken to engage the locating dowels.
Fitting the Axle Shafts
As mentioned before always use new O rings when re-fitting the axle shafts.
Make sure the mating surfaces are clean.
The easiest way to keep the O ring in position while fitting the shafts is to slightly withdraw the oil seal sleeve
and stretch the O ring over it, so that it slides into position when the hub is assembled.
If the sleeve is jammed in place, the O ring can be held in position with a small amount of blue gasket cement
at two diametrically opposite points.
Push a bolt through the brake back plate and bearing housing to align the holes,
make sure you know which side of the car the axle is for and offer it up with the brake cylinder in the correct orientation.
Turn the axle shaft slightly to engage the splines with those in the differential cogs,
and push the assembly home onto the axle flange without hesitation.
Do not be tempted to remove the housing from the flange again unless you sense that the O ring is not seating properly.
If you do, the O-ring will probably drop out of position and you will have to start all over again!
Put the securing nuts and bolts in and tighten them up evenly.
Re-fit the brake pipes and hand brake linkage.
Now is the ideal time to clean and lubricate the handbrake draw link and tappets....
Click HERE to see how!
Re-fit the brake shoes, brake drums and re-set the adjusters.
Finally bleed the brakes and fit the road-wheels.
Don't forget to fill the axle with oil! and take the car out for a test drive.
It is a good idea to drain the oil after a few miles and replenish with new,
in order to eliminate any foreign matter that may have entered the axle.
BACK TO THE TECHNICAL MENU
HOME
 While the oil is draining, loosen and remove all but one of the nuts (9/16th inch AF)
holding the bevel pinion housing to the axle casing.
These may be difficult to locate as often oil leaks have attracted dust and dirt which builds up to a
thick coating all over the assembly. If you are planning to recondition your unit,
rather than swap it for another one,
bear in mind the more muck you get rid of now the less will fall into the working parts later!
Otherwise, just concentrate on removing enough of it to get the nuts and shakeproof washers off,
and clean up the area round the join so than none will fall into the axle casing as you remove the assembly.
While the oil is draining, loosen and remove all but one of the nuts (9/16th inch AF)
holding the bevel pinion housing to the axle casing.
These may be difficult to locate as often oil leaks have attracted dust and dirt which builds up to a
thick coating all over the assembly. If you are planning to recondition your unit,
rather than swap it for another one,
bear in mind the more muck you get rid of now the less will fall into the working parts later!
Otherwise, just concentrate on removing enough of it to get the nuts and shakeproof washers off,
and clean up the area round the join so than none will fall into the axle casing as you remove the assembly.
 This picture shows a sectional view of the rear hubs,
and the bolts (21,22,23) that hold the axle shaft assembly in place.
It is a good idea to clean as much of the mud as you can from the area to avoid it getting in the works
when you pull the axle shafts out.
This picture shows a sectional view of the rear hubs,
and the bolts (21,22,23) that hold the axle shaft assembly in place.
It is a good idea to clean as much of the mud as you can from the area to avoid it getting in the works
when you pull the axle shafts out.
 Place drip trays under each side of the axle and undo the nuts and bolts holding the axle shaft assemblies in place.
Again these are 9/16th inch AF. To remove the hub assembly,
try pulling on the bearing housing rather than the back plate which is not attached to the hub housing.
It is unlikely to be necessary, but you may need to try knocking the bearing housing flange at (A)
in the picture with a hammer and block of wood to break the seal.
Fully undo the brake pipe unions and protect the ends of the pipes with bleed nipple covers if you have any.
Withdraw the axle shaft assembly.
Place drip trays under each side of the axle and undo the nuts and bolts holding the axle shaft assemblies in place.
Again these are 9/16th inch AF. To remove the hub assembly,
try pulling on the bearing housing rather than the back plate which is not attached to the hub housing.
It is unlikely to be necessary, but you may need to try knocking the bearing housing flange at (A)
in the picture with a hammer and block of wood to break the seal.
Fully undo the brake pipe unions and protect the ends of the pipes with bleed nipple covers if you have any.
Withdraw the axle shaft assembly.
 This picture shows the bit that bolts up against the flange on the axle casing.
Notice the rubber O ring that is not illustrated in the sectional diagram of the hub!
This o-ring performs two vital functions.
This picture shows the bit that bolts up against the flange on the axle casing.
Notice the rubber O ring that is not illustrated in the sectional diagram of the hub!
This o-ring performs two vital functions.
 With the axle shafts withdrawn it should now be possible to remove the pinion
housing assembly complete with differential from the axle casing.
It is very heavy indeed. Much heavier than it looks. Get the idea!
If you are going to recondition the unit, put a thick cushion,
or layers of old carpet on the ground underneath the axle (otherwise don't bother)
Undo the last nut and give the pinion housing a few blows with a mallet to loosen it up.
Pull the assembly out of the axle casing towards the front of the car. DO NOT GET UNDERNEATH IT!
Get your arms in a position where they will not get trapped or twisted. Pull the thing out and let it fall to the ground.
With the axle shafts withdrawn it should now be possible to remove the pinion
housing assembly complete with differential from the axle casing.
It is very heavy indeed. Much heavier than it looks. Get the idea!
If you are going to recondition the unit, put a thick cushion,
or layers of old carpet on the ground underneath the axle (otherwise don't bother)
Undo the last nut and give the pinion housing a few blows with a mallet to loosen it up.
Pull the assembly out of the axle casing towards the front of the car. DO NOT GET UNDERNEATH IT!
Get your arms in a position where they will not get trapped or twisted. Pull the thing out and let it fall to the ground.
 This picture shows the uneven wear on the crownwheel teeth on the differential from my car.
The outer tips are rough and pitted. It is interesting to note that although the thing whined badly,
it was nowhere near mechanical failure. There really is a huge amount of metal in these things!
The differential cogs can be seen in the background.
This picture shows the uneven wear on the crownwheel teeth on the differential from my car.
The outer tips are rough and pitted. It is interesting to note that although the thing whined badly,
it was nowhere near mechanical failure. There really is a huge amount of metal in these things!
The differential cogs can be seen in the background.
 In order to clean the unit effectively I ended up removing the pinion drive flange and the forward pinion roller bearing,
and working petrol into all the nooks and crannies with small artists paint brushes.
Once the petrol had evaporated any adhering globules were brushed away.
Do not use a vacuum cleaner anywhere near petrol vapor, since sparks from the motor may ignite it!
The pinion bearing, driving flange and oil seal housing can be seen removed in the foreground.
In order to clean the unit effectively I ended up removing the pinion drive flange and the forward pinion roller bearing,
and working petrol into all the nooks and crannies with small artists paint brushes.
Once the petrol had evaporated any adhering globules were brushed away.
Do not use a vacuum cleaner anywhere near petrol vapor, since sparks from the motor may ignite it!
The pinion bearing, driving flange and oil seal housing can be seen removed in the foreground.
 Here you can see how the pinion bearing and oil seal are arranged in the nose of the pinion housing,
and pinion oil seal housing respectively. The crown wheel and pinion exert a huge amount of force on each other,
and it is necessary to pre-load the pinion bearings in order to maintain correct alignment of the gears
under these conditions. Misalignment will cause more rapid wear of the gears.
The mesh can be checked by painting the gear teeth with engineers blue and observing the pattern made by the teeth
as they mesh.
Here you can see how the pinion bearing and oil seal are arranged in the nose of the pinion housing,
and pinion oil seal housing respectively. The crown wheel and pinion exert a huge amount of force on each other,
and it is necessary to pre-load the pinion bearings in order to maintain correct alignment of the gears
under these conditions. Misalignment will cause more rapid wear of the gears.
The mesh can be checked by painting the gear teeth with engineers blue and observing the pattern made by the teeth
as they mesh.
 In my experience the shims that affect the bearing pre-load (A) tend to wear and break up as shown here.
This will be obvious because the castellated nut securing the driving flange to the pinion shaft will appear
looser than expected. If this has happened you will have to buy some news shims from Landrover or John Wearing
before you can reassemble the unit.
In my experience the shims that affect the bearing pre-load (A) tend to wear and break up as shown here.
This will be obvious because the castellated nut securing the driving flange to the pinion shaft will appear
looser than expected. If this has happened you will have to buy some news shims from Landrover or John Wearing
before you can reassemble the unit.
 Smear sealant on the mating surface of the pinion oil seal housing and offer it up to the pinion housing.
fit the tab washers and loosely screw in the housing retaining bolts.
Smear sealant on the mating surface of the pinion oil seal housing and offer it up to the pinion housing.
fit the tab washers and loosely screw in the housing retaining bolts.