Windscreen Removal and Replacement
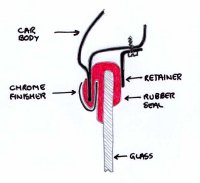
This sketch shows how the windscreen of the Rover P4 is fitted.
It is lightly held by the rubber lipping over the body aperture,
and then secured with retainers screwed or bolted to the car body from the inside.
To remove the windscreen
The workshop manual advises that you prise the chrome finisher out of the seal.
I would advise that you don't try to do this,
since it will almost certainly result in the finisher getting bent and hence ruined,
especially if the rubber has hardened with age,
and then hey presto you'll have to find another finisher and have it re-chromed before you can put the thing back together.
Instead, sacrifice the rubber seal (which would normally be replaced anyway) by using the following method...
Remove the interior trim and windscreen retainers. The bolts holding the side retainers in place tend to get bent
under the strain, so the most practical option seems to be to remove the nuts with a box spanner from the inside
while preventing the heads (which can be found behind the door seal) from turning using a screwdriver.
With the retainer removed the bolts should be easier to remove from the door pillar.
Pull the wiring in the passenger side door pillar recess aside to make room for the glass to be manipulated
into the recess.
Cut away the flap of the seal that goes over the glass, see diagram.
Work the glass away from the seal (if it was not already loose) and move it sideways into the passenger door pillar
recess when it should be possible to get the drivers side past the door pillar and thus remove the screen from the car
leaving most of the seal in place on the body aperture.
Now cut away the flap of rubber that would normally be between the glass and the back of the chrome finisher.
Finally slide aside the finisher joint clips and carefully work the finisher free,
The remains of the seal can now be removed from the body aperture.
To refit the windscreen
Clean the edge of screen and body aperture.
Fit the seal to the screen taking care to use the correct slot. It may need stretching on.
Fit two lengths of washing line into the body slot in the rubber partially overlapping in the middle of the top
and bottom. Tape the loose ends to the outside of the screen.
Offer the screen to the car from the inside.
With the bulky seal on the glass, the full depth of the door pillar recess is required, and the screen really will
not clear the pillar on the opposite side unless the wiring loom is pulled well clear so that the full depth can be used.
There is more slack available from under the glove box than behind the cant rail.
With someone holding the screen from the inside, pull the washing line from the outside so pulling the rubber lip over the
edge of the body aperture. Work evenly from the top and bottom taking care not to rip the rubber.
Put plenty of sealant (i) between the outside of the windscreen and the rubber seal and
(ii) between the seal flap and the car body.
I prefer to use Evostick Roof and Gutter sealant for this.
It may sound odd, but it is a black rubberised bitumen sealant very close to the original type,
and it also has the advantage that the surplus can be cleaned off with white spirit.
Other manufacturers offer a bitumen based sealant, but in my opinion the consistency of the Evostick one is best.
I have an absolute loathing for silicone sealant, which never quite seems to seal everywhere,
and yet is impossible to remove... and let me tell you, you'll have sealant everywhere before you've finished...
Anyway I digress. The next step is to slide the finisher into position.
I strongly recommend that instead of using soapy water when fitting the chrome finisher,
you paint Hellerine lubricant which is available from Electrospeed
(stock number 254-62063D) round the lip of the slot...
obviously being careful not to get any near the sealing surfaces of the seal.
This is a special rubber lubricant that dries out with time.
It is amazingly slippery and really makes fitting the finisher a doddle.
Make sure you know which side of each finisher strip is for the top of the windscreen by holding them against the car
and comparing the shapes.
Locate the corners of the finisher in the slot at the top and bottom of the seal and use the slots to guide the finisher
as you slide it into position at the sides. Finally slide the joint clips onto one of the halves, top and bottom.
Bring the ends of the finishers together so that as you push them down (or up) into the slot they lever against each other
to push the sides firmly home. Slide the joint clips over the join.
Don't worry if the corners or sides of the screen don't seem tight up to the body. The job is still not done and
fitting the side retainers will sort this out.
When fitting them I also advise lubricating the back of the seal with Hellerine to help the retainer slide against it.
The retainers are slightly tapered and as they are pulled into the door pillar recess, so they push the sides of the
screen against the body. As you do this loads of sealant will ooze out...
This is a good sign because it means you put enough in!
Don't worry about using the old bolts to refit the side retainers.
They will almost certainly be bent and horrible, and more importantly they're too short to be able to get
the nuts on easily... Instead, use new longer ones. They should be 2BA countersunk, but I used 5mm - how unwholesome!
This means that you can get the nuts onto the thread before the retainers are under load.
Again a box spanner is ideal for doing them up with the long thread protruding.
By the way, it's much easier to put the bolts through the door pillar
before fitting the retainers, which want to end up flush with the rearward edge of the door pillar,
taking care not to damage the insulation on the wiring loom.
This done you can trim off the extra thread.
I presume that they must have had a jig to pull the retainers into place on the production line.
The remaining retainers are held in place with self tappers.
Do not overtighten them and strip the thread.
Finally, it is easier to fit the windscreen surround before the crash rail. Good luck!
BACK TO THE TECHNICAL MENU
HOME
