The Brake Master Cylinder
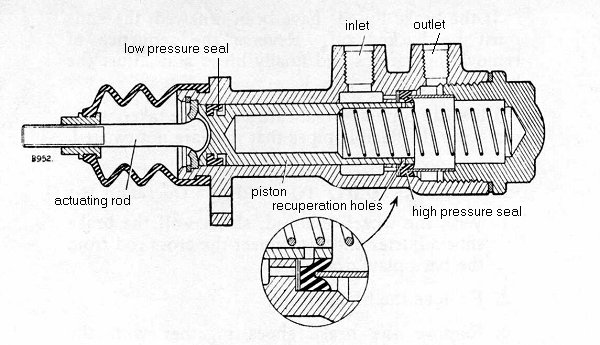
 Here is a sectional view of the brake master cylinder.
The inset view shows how the high pressure seal is bypassed when the piston is at rest and recuperation
can occur from the low pressure fluid.
There is a wavy washer (4) behind the high pressure seal to provide a path for the recuperating fluid.
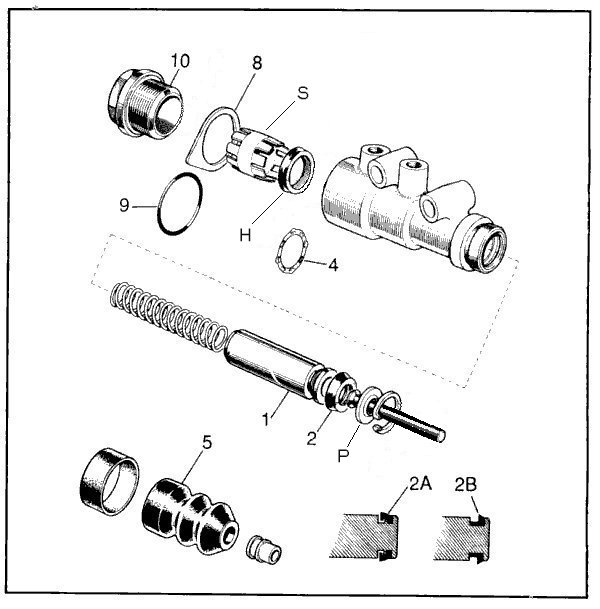
 Here's an exploded view of a similar master cylinder which shows the piston,
high and low pressure seals and general assembly.
There are two seals in the master cylinder.
The seal (2) fits into a groove in the piston (1) and operates under relatively low pressure
due only to the height of the brake fluid reservoir above the master cylinder.
Failure of this seal will result in gradual loss of brake fluid which usually ends up as a pool under the car
after it has been parked for a while.
Also check for dampness around the rubber boot (5) at the forward end of the master cylinder.
Failure of the low pressure seal will not affect the breaking performance until the reservoir empties,
but I would not advise driving the car with this fault.
The high pressure seal (H) is located deep in the body by a plastic spacer (S) which in turn is held in place by a
huge hollow bolt (10) which caps off the rearward end of the cylinder.
The seal between this bolt and the master cylinder body is either a copper washer (8) or a rubber O ring (9).
When the brakes are applied the piston passes through the high pressure seal which remains stationary.
The piston is hollow and houses the return spring.
The piston is prevented from being fired out of the front of the master cylinder by a retaining plate (P) held in
place by a circlip. The retaining plate also serves to hold the actuating rod captive.
Tips for rebuilding the master cylinder
The large bolt on the end is extremely difficult to remove, and the cylinder is difficult to hold in a vice.
I would suggest trying to get the nut started while the master cylinder is still bolted to the outrigger.
That way half the awkwardness is overcome.
Whether this approach is a good idea or not for you largely depends on how strong your outrigger looks.
Use a decent ring spanner or socket and heave. I have found yanking things suddenly,
more effective than applying force gradually. My father told me that this is known as "impact loading"
which is evidently not the same as whacking it with a hammer!
The cylinder is made of brittle cast iron and will cost about £120 to replace if you bust it.
The other approach is to take the cylinder to your favourite garage and ask them to get the nut off.
As with all jobs, one thing can lead to another, and this is especially true when disconnecting the pipes
from the master cylinder. These can seize to the nuts, so when you attempt to undo them the pipes twist and
collapse in on themselves. Waggling the pipes about a bit after you've fractionally loosened the unions is a
good idea to try and break the bond between pipe and nut. If disaster strikes,
all is not lost; replacement pipes are available. Also beware the adaptor may tend to unscrew from the body rather
than the nut from the adaptor. A second thin spanner may be needed on the adaptor.
The forward end of the cylinder is likely to be in the worst shape because it is in the firing line of all the
muck and water thrown up by the front wheel. If the seal of the boot is defective,
water gets in and rusts the cylinder walls. It is up to the person carrying out the work to decide whether or not
an old cylinder can be rebuilt successfully and safely.
On the low pressure seal it is generally acceptable to remove any surface roughness or
blemishes in the cylinder wall with very fine wet and dry paper and finish with metal polish.
It is not advisable to remove large imperfections this way because the bore will become too large and irregular
for the seal to operate reliably.
If the piston shows signs of scoring a new master cylinder must be bought or an alternative one found
for reconditioning. Don't throw your old one away One day it may be economically viable to recondition it!
There isn't much else to go wrong with the master cylinder.
Make sure everything is scrupulously clean upon reassembly and lubricate all seals well with special red rubber grease.
Do not under any circumstances use normal grease, "copper ease" or oil.
You can use brake fluid but it's messy horrible hygroscopic stuff and is therefore a bad idea if you are rebuilding a
part to keep as spare.
One final tip... It is difficult to purge all the air from the master cylinder after a rebuild.
You will save a lot of time and brake fluid by filling it up as much as you can on the bench,
before you fit it back to the car.
BACK TO THE TECHNICAL MENU
HOME
 Here is a sectional view of the brake master cylinder.
The inset view shows how the high pressure seal is bypassed when the piston is at rest and recuperation
can occur from the low pressure fluid.
There is a wavy washer (4) behind the high pressure seal to provide a path for the recuperating fluid.
 Here's an exploded view of a similar master cylinder which shows the piston,
high and low pressure seals and general assembly.
There are two seals in the master cylinder.
The seal (2) fits into a groove in the piston (1) and operates under relatively low pressure
due only to the height of the brake fluid reservoir above the master cylinder.
Failure of this seal will result in gradual loss of brake fluid which usually ends up as a pool under the car
after it has been parked for a while.
Also check for dampness around the rubber boot (5) at the forward end of the master cylinder.
Failure of the low pressure seal will not affect the breaking performance until the reservoir empties,
but I would not advise driving the car with this fault.